Saturday, February 24, 2007

Squirt the Dye

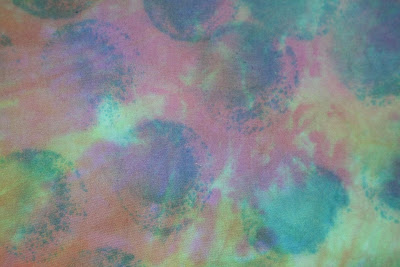
For this last example, I loaded thickened dye into small syringes and squirted it on to a piece of white fabric.

It looked pretty naked, so I filled in the background with other colours of thickened dye using a small paintbrush and the round sponges stamps. Because the fabric was wet, the background stuff washed across the fabric.


This is really the only one that I like from the entire lot. I'm thinking about entering it into the Sydney Quilt Festival in June. To cut or not to cut ... that is the question.

I tried all these techniques from the last couple of blog posts in a workshop I took recently and confess that I have learned a couple of things that I didn't expect to learn.

First of all, working with thickened dyes really isn't that much fun. Cooking the resists, mixing up the soda ash and soaking fabrics to make them nice and slimy and smelly, gallons of water washing things out again and again ... lots of work for some pretty mediocre results. I think that the fabrics looked better before they were dyed. OK, the potato resist ones aren't too bad. But I think that I'll stick to fabric paints and inks and give the dyes a miss.

Second, I should have brought white or light coloured fabrics to the workshop. The samples I haven't shown you were too dark to start off with and just ended up, well, darker.

Third, thickened black dye doesn't separate into different colours like black ink does when you apply it to very wet fabric. All it does is turn your fabric ... wait for it ... black. I didn't show you that one because, well, you've seen black fabric before.

And, finally, I am really not very good at workshops. Other people really get into the spirit of the thing and have a great time, so it must be me. I find the pace too slow, too much time wasted waiting around, getting that vital piece of information just moments after it is too late and the almost guaranteed disappointment with the results.

Don't get me wrong. Some of the stuff I've posted isn't really that bad. But I think that I liked the hand-dyed fabrics more before I used them at the workshop.

Fortunately, I have a couple more bits tucked into my stash and have a very reliable source for more.

Friday, February 23, 2007

Stamped Fabric

I remember one of the few things I ever enjoyed about elementary school art was the time we dropped one drop of India ink on a piece of wet coffee filter paper that had been folded into quarters and thoroughly wetted. The black ink ran through the filter paper breaking up into its component colours like light through a prisim.

So this time I wanted to get the black thickened dye to run like the India ink did. I know, 'thickened' should have been a clue. But I gave it a go and thought about that when I was the not-really-running-at-all results. Smudged, yes ... running, no.

Thursday, February 22, 2007

Striped Fabrics

OK, back to the fabrics ...

For this next batch, I used a foam roller brush and rolled thickened black dye on two pieces of hand-dyed fabric.

Note: Seems that Blogger lost the photos for this post so I replaced them on 1 December, 2007

Tuesday, February 20, 2007

Queen Mary II Arrives in Sydney Harbour

We interrupt our regularly scheduled blog postings to bring you these special photos.

Very early this morning, just after sunrise, the Queen Mary II sailed into Sydney Harbour. Usually big cruise ships dock at the International Terminal at Circular Quay or on the other side of the bridge at Darling Harbour. But QMII is so big that it can't get under the Harbour Bridge so it docked at the naval yards at Garden Island.
And, as you would expect, all the smaller boats came out to see their big sister.
And just how big is the QMII? Almost as tall as the Sydney Opera House.

This is what Garden Island usually looks like from the top floor of the building I work in on Martin Place ...
... and here is what it looked like this morning.
On the way home this afternoon, the crowds were already gathering for the arrival of QMII's little sister, Queen Elizabeth II, and the fireworks scheduled for later on this evening.
QMII is scheduled to leave at 11pm this evening, way past my bedtime.

Sunday, February 18, 2007

Spotty Fabrics

These were hand-dyed fabrics that were stamped by round foam shapes.

This fat quarter was spotted up with a round foam stamp loaded up with black thickened dye, rolled a bit with a striped foam roller with a bit of green still in it and then painted over with lemon yellow thickened dye.


This is a quarter of a hand-dyed fat quarter. Because of the colour already in the fabric, I was concerned that adding more colours would just make it darker. So I used a smaller round foam stamp and lemon yellow thickened dye.


And another quarter of a hand-dyed fat quarter, this time stamped with the same round foam stamp loaded up with blue thickened dye.

Saturday, February 17, 2007

Flour Resist #2

For this one, I tore strips of masking tape and put it on the fabric. Round stickers were added next. Then I spread the flour paste resist to the same pale green fabric that was taped to the table.

After the resist was dry, I pulled off the masking tape and some of the dots. After tearing the tape carefully to make the ends square, some of the resist came off when I removed the tape so I still ended up with raggedy bits. It was also difficult to take off the dots without taking off more resist.

The area on the left at the hub of the masking tape spokes had more dots but I couldn't break through the resist easily to remove them. So I left them stuck under the resist. You can just see their ghosts.

Thickened orange dye was painted all over and left to dry. The flour resist did a pretty good job of keeping the dye away from the fibres where it was thick enough.

Friday, February 16, 2007

Flour Resist #1

With this one, I used the same tape-to-firm-surface technique but changed to a flour paste resist. I dunked a paint brush in the resist and randomly applied the resist.

Two different thickened dyes were applied after the flour paste resist had dried: green followed by turquoise. This resist doesn't crack but has to be applied thickly in order to keep the original pale green colour of the fabric.

Where the flour paste resist was thinner, the blue dye managed to get through to the fibres. Maybe the blue dye wasn't as thick as the green dye.

Thursday, February 15, 2007

Potato Resist #2

This resist was applied to another piece of the same pale green fabric, but spread on thinner this time.

While it was still wet, it was marked up something that looked like two combs on a post that could be attached to something. One comb had teeth wider than the other. And the round shapes in the middle were from the attachment end of the post.


Much finer cracks this time. Medium green thickened dye was dabbed on, same as last time. But smaller cracks means that less dye got to the fibres.

And two closeups.


More interesting result methinks.

Wednesday, February 14, 2007

Potato Resist #1

First, I taped a very light green piece of fabric to a piece of plastic (like a ruler used for rotary cutting) pulling the masking tape to keep the fabric tight. I smeared some mashed potato paste resist all over it in a thick layer and then marked it with a big comb-looking plastic thing. (Sorry about the technical jargon.)


Then I let it dry overnight. The cracks I got looked really good.

The idea is that the resist grabs on to the fibres and doesn't let the dye in. So, I dabbed it with some thickened dye but it wasn't quite thick enough and the nice cracks in the resist let too much dye through.

And some close-up shots.


You can see that there is a bit of the mashed potato paste left on the fabric.