Sunday, October 11, 2009

My Latest Quilt

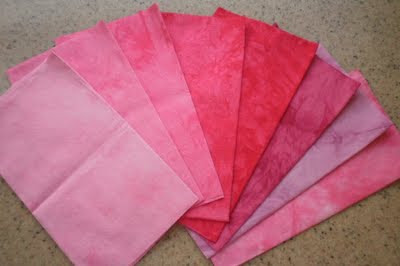
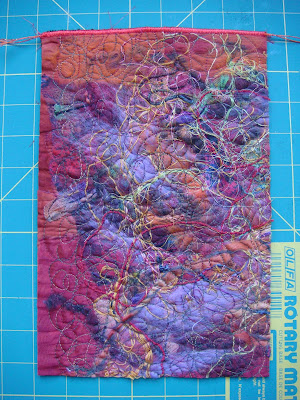
Recently, I took an Aurora workshop with Lisa Walton of Dyed and Gone To Heaven and this is the result. So simple, even for those of us who are pathologically unable to follow the directions. Add to that good food, good venue and good classmates and I'm even happier with the results.

It is a bit of a variation on the original pattern, a planned variation for those who know me too well, because I decided not to cut the binding from the base fabric and use facings instead. That made the quilt a bit bigger ... more room for quilting and embellishments. And that is always a good thing.

The Sydney Quilt Show is only 8 months away ... can I get it done in time?

Updated on 11 October: For those who don't believe that I actually take workshops ... check out Lisa's blog for the proof. I'm the one in the red jumper (sweater).

Friday, September 25, 2009

My Kambrachallenge Quilt for 2009

We each started out with this tube of 40 7" squares, Blue and Green 1895 Bali Watercolours by Hoffman, two squares of each fabric.

The rules for the Kambrachallenge are simple: use some of each fabric in whatever you make for the challenge. So, I thought about it, off and on, until about a month before the unveiling. Got off to a good start by winding some bobbins and finding the tube of squares. Getting the tube open and the fabric out was a challenge in itself. Baby steps ...

I actually got started two weekends before the unveiling, raided my stash, had to unpick and resew the dark block which was as much fun as you imagine. And I finished about an hour or so before I had to be there. Plenty of time to spare ...

And here is my quilt top for the 2009 Kambrachallenge:

To see the rest of this year's Kambrachallenge quilts and the ones from previous years, go here.

Next year's challenge fabrics look like this:

For some reason I keep thinking of Pepto Bismol ... not sure why. But I am sure that by mid to late July I will be completely inspired ... if only by the looming early August deadline and not by the fabrics.

Thursday, September 24, 2009

How Long Did The Dust Last?

This is what the sky looked like at 6am yesterday morning ...

... and by 4pm it was another beautiful day in Paradise.

Wednesday, September 23, 2009

Dusty Sydney

When I got up at 6am this morning, I thought that the light looked a bit weird. Then I looked out the window and the sky was red. Really red.

So I did what any self respecting person would do: got dressed, grabbed the camera and drove down to the wharf.
Sydney CBD is out there ... somewhere ...
And, for this morning at least, someone's million dollar views are worth about $1.98
With visibility on the water down to less than 100 metres, there won't be any ferries this morning.

Tuesday, July 07, 2009

Visual Diary Envelope

After yesterday's creative frenzy, there was still another half of the textile collage left over. Time for another design for a visual diary cover ... this time, an envelope.

Repeat yesterday's process for finishing the edge, but this time starting with the inside edge of the envelope.


I used an expresso cup as a guide to rounding the corners of the top flap.


Here, the top corner is marked and the bottom corner is cut. I tried to cut around the expresso cup with a rotary cutter while holding the cup in place, but found that drawing first and cutting second was easier.

Here is the rounded flap all cut and ready to be finished.

I added the hook side of a piece of velcro for the closure to the inside edge that will be covered by the rounded flap.

A close-up of the stitching on the hook piece of velcro. A couple of times around should make sure that it holds up to repeated opening and closing of the flap.

Being an Engineer, I checked again for fit before sewing the sides together. Looking good.


To finish assembling the envelope, I sewed with zig zag stitch and my handy dandy walking foot around the sides and rounded flap back and forth 6 times so that the edge was well covered but not too bulky. Using rayon thread gives the finished edge a nice sheen.

I think that the loops part of the velcro closure to the rounded flap side should go ... about ... here.

And it's done. Took longer to upload the photos and write about it than it took to make.

As for the finished visual diary envelope, here's the back ...

... and here's the front.

I think that this one turned out pretty well too.

Monday, July 06, 2009

Visual Diary Pocket

I've recently switched from using a spiral bound visual diary to one from Moleskine. While I like the paper in the Moleskine diary better, I miss being able to put my pen in the spiral binding of my old visual diary. And I am pretty much over searching for my pen. So, I decided to make a pocket for my Moleskine visual diary that had room for a pen as well.

This is a textile collage that my friend Lisa Walton of Dyed and Gone to Heaven gave me a while back. I used it in a faux felt demo I did at the SCQuilters Retreat in Perth. Actually, just half of it.

Looks like it will be big enough ... Houston, we have lift off!

I trimmed up the textile collage and folded it in half. One more check on the size ...

... perfect. Now which thread to use? This is why you need a nice stash of threads ... dark orange rayon ... bright orange rayon ... a very rich orange cotton ... decisions, decisions, decisions ...

I think the dark orange rayon will do the trick.

First step was to stitch across the top of the pocket. I used a wide zig zag and caught two strands of pearle cotton under the stitch. I think that it makes for a nicer edge and maybe makes the edge a bit less likely to stretch over time. Then I did 4-6 more zig zags across the edge, a bit narrower this time, to fill it in and be sure that the edge was well covered.

Here's a close up of one of the corners. You can see the pearle cotton caught under the stitching.

And here's the back. Yes, I used a bright pink cotton in the bobbin. Trying to decide if the pocket needs to be lined. Nope. Looks OK as is to me.

To finish making the pocket, I switched from the open toed embroidery foot to a walking foot, reduced the pressure on the presser foot from 3 to 2 (we're sewing through quite a few layers here). I stitched down the side 1/4" from the edge back and forth a couple of times, going slow enough to hit the same line of stitching each pass. I did the same thing across the bottom.

Then I zig zagged the raw edges ... remember, no lining ... to keep things inside nice and tidy. I didn't zig zag around the corner but stopped before I got there.

Here's a close-up of the top of the pocket ... notice that I stopped the zig zag before I got to the stitching at the top edge.

I cut the notch off the corner to reduce the bulk when the pocket is turned right-side out. Here's a close-up of the corner.

And, just for completeness, a close-up of the corner on the folded side.

This took some determination. Two layers of felt in the middle makes it sturdy but a bit resistant to being turned right-side out.

I used a chopstick to get the corner with the notch cut into it to look like a sort of square corner.

Another size check ... I can't help myself ... it's an Engineer Thing.

And here's the finished visual diary pocket.

Very good job, if I do say so myself. Now, what to do with the other half of the textile collage?

Sunday, July 05, 2009

Studio Journal Class -- Watercolours

Another exercise for the Studio Journals class with Sharon Boggon at Joggles was to play with watercolour paints. While the first one was still wet, I placed some plastic wrap on it and let it dry. Pretty cool creases in the colour.

With this one, I put some salt on the paint while it was still wet. It added some variation to the colours in the brush strokes.

Saturday, July 04, 2009

My Fav at the Sydney Quilt Show

This quilt was one of my favourites at the recent Sydney Quilt Show. I probably should have asked Michelle if I could post the picture of this quilt to my blog, but I'm pretty sure that she won't mind.

Friday, July 03, 2009

Studio Journal Class -- Paper Cuts

I'm taking the online course Studio Journals with Sharon Boggon through Joggles and this week we made some paper cuts.

I used oragami paper for mine ... just can't go past the colours ... and the first one is from a 5" square of oragami paper.
This one came out bigger than I expected, so for the next paper cuts, I used half of the 5" square. These paper cuts from rectangles would be great as fabric stamps.
The 5" squares were pretty big so I cut them into quarters and made these paper cuts.