

Thursday, April 30, 2009
Wednesday, April 29, 2009

Tuesday, April 28, 2009

Monday, April 27, 2009

Sunday, April 26, 2009

Saturday, April 25, 2009
Big Bubbles #1

I couldn't decide which of these I liked the best, so I decided to publish them all. Yes, Michelle, another series. But don't worry ... it's a short one.
Friday, April 24, 2009

Thursday, April 23, 2009
I've Spent Days Whining About Roses
One of the challenges at the Adelaide Retreat was to make a table topper in keeping with the theme of Days of Wine and Roses. I'm always up for a challenge but, not being a real flower girl, was struggling a bit. So, I decided to take another tack and, instead of following the theme to have a bit of a play on words.
I bought some fabrics with big roses (or similar flowers) printed on them. I was tempted to buy other fabrics, any other fabrics, but forced myself to stick with roses. But I wasn't happy and was not very successful at keeping it to myself, much to the amusement of the ladies at my local patchwork shop.
I ironed vlysofix on the back of the fabrics and cut out the big flowers. I'd already picked a pink rose fabric for the background so peeled off the papers and started laying out the first round of flowers, some big red roses.
 The next layer was some flowers from a Kaffe Fassett print.
 I filled in the centre with some yellow and orange flowers that were sort of rose-like (if you didn't look too closely). I used my carpet as my design wall and ironed down the three circles of flowers after the yellow ones were in place.
 I quilted it starting from the centre and worked my way out, round by round, to the edge of the piece using up some variegated threads that sort of were in keeping with the colour scheme.
Some close-up photos of the finished quilt, appropriately named I've Spent Days Whining about Roses.

 I finished it with a facing instead of a binding and the backing fabric was chosen to represent my creative pain and whining.

Wednesday, April 22, 2009
Winners are Grinners
 As part of the Adelaide Retreat, there was a raffle to raise money for the Jane McGrath Foundation, an excellent cause. After that little shopping adventure to Cape Coast Textiles, I was a bit short of cash, but managed to come up with enough to buy a couple of tickets, with some help from my friends.
The raffle was drawn on the Saturday night dinner. I was lucky enough to win this table runner and placemats kindly donated by Lisa Walton of Dyed and Gone to Heaven. The top placemat shows the front, but I actually like the backs of the placemats as well.
I am one of those people who usually don't win anything so, while the raffle tickets were being drawn, I was chatting away with the others at my table and suddenly heard my name called. I had no idea why, although my first thought was that I was being called down for talking when I should have been paying attention. Like that has never happened before. So imagine my surprise to discover that I'd actually won something!
Maybe I should go buy a lottery ticket ...
Tuesday, April 21, 2009
African Fabrics in the Adelaide Hills
As part of my preparations for the Adelaide Retreat, I checked the list of shops that Sharron Shimbell maintains on our SCQuilters web site. There is one for South Australia and each of the other states in Australia, as well as information about shops in New Zealand and other places.
So, I printed out the list and was reading through it on the plane when I came across Cape Coast Textiles. Hmmm, African fabrics. That might be interesting. And, on Saturday, Michelle, Sally and I set out on a bit of a fabric shopping adventure. It could be good ... it good be bad. Wouldn't know until we got there.
We drove through Adelaide and up into the Adelaide Hills, winding through the back roads to Lia's. We parked about half-way up the drive and walked up the hill to the shed out the back. Looked like a typical Aussie shed, nothing flash. We didn't realise that we were hiking up to African Fabric Nirvana.
There were a half dozen tables around the room and they were covered in the most amazing selection of African fabrics you could imagine. It was spectacular! Let the shopping begin!
The fabrics as Cape Coast Textiles were all 100% cottons, except for a sari piece or two, which were silk. They can be used for patchwork, clothing or home furnishings. While they have some sizing in them at the shop, they wash up beautifully and have a lovely hand.
As an added bonus, some of the cotton base fabric has a damask-like texture woven in which isn't obvious until you pick up the piece and move it in the light. And, with one wall of the shed all windows, there is enough light to see the colours and textures while the trees surrounding the shed mean that the fabrics don't get sun damaged.
Each length of fabric is marked with the price, which ranges from $22 to $28 per metre.
Here are some pictures of what I bought. First, the oranges ...
 ... some great greens/reds ...
 ... some rather impressive turquoise and purples ...
 ... and some greens/blues.
 Michelle bought me this as a reward for great restraint and self control and not going into the Fat Quarter Draw at the Retreat.
 And these are some fat quarters for my DSIL Jan, but don't tell her. I want them to be a surprise.
Lia is a delight and very knowledgeable about the fabrics, in some cases even knowing who made them and the details of how they are made. And she really enjoyed watching us fossick through the treasures.
If you want to go shopping at Cape Coast Textiles, there are some important details you should know:
And my personal thanks to Sharron Shimbell for keeping up the SCQuilters shop list. Without her tireless efforts, I would have a lot more cash in my pocket but my stash (and my soul) would so much the poorer.
So, I printed out the list and was reading through it on the plane when I came across Cape Coast Textiles. Hmmm, African fabrics. That might be interesting. And, on Saturday, Michelle, Sally and I set out on a bit of a fabric shopping adventure. It could be good ... it good be bad. Wouldn't know until we got there.
We drove through Adelaide and up into the Adelaide Hills, winding through the back roads to Lia's. We parked about half-way up the drive and walked up the hill to the shed out the back. Looked like a typical Aussie shed, nothing flash. We didn't realise that we were hiking up to African Fabric Nirvana.
There were a half dozen tables around the room and they were covered in the most amazing selection of African fabrics you could imagine. It was spectacular! Let the shopping begin!
The fabrics as Cape Coast Textiles were all 100% cottons, except for a sari piece or two, which were silk. They can be used for patchwork, clothing or home furnishings. While they have some sizing in them at the shop, they wash up beautifully and have a lovely hand.
As an added bonus, some of the cotton base fabric has a damask-like texture woven in which isn't obvious until you pick up the piece and move it in the light. And, with one wall of the shed all windows, there is enough light to see the colours and textures while the trees surrounding the shed mean that the fabrics don't get sun damaged.
Each length of fabric is marked with the price, which ranges from $22 to $28 per metre.
Here are some pictures of what I bought. First, the oranges ...
 ... some great greens/reds ...
 ... some rather impressive turquoise and purples ...
 ... and some greens/blues.
 Michelle bought me this as a reward for great restraint and self control and not going into the Fat Quarter Draw at the Retreat.
 And these are some fat quarters for my DSIL Jan, but don't tell her. I want them to be a surprise.
Lia is a delight and very knowledgeable about the fabrics, in some cases even knowing who made them and the details of how they are made. And she really enjoyed watching us fossick through the treasures.
If you want to go shopping at Cape Coast Textiles, there are some important details you should know:
- Cash only. Lia doesn't take credit cards, so save yourself the embarrassment of searching through every nook and cranny of your wallet and purse looking for hidden cash and go to the ATM on the way
- Call ahead. Lia has a real job so you will need to contact her first to arrange a time to stop by. Lia's phone number is (08) 8339 7770 and her mobile is 0410 170 701
- Minimum cut: 1 metre. The fabrics are in varying lengths (up to 8 metres) and Lia is happy to cut them for you.
And my personal thanks to Sharron Shimbell for keeping up the SCQuilters shop list. Without her tireless efforts, I would have a lot more cash in my pocket but my stash (and my soul) would so much the poorer.
Monday, April 20, 2009
How Do You Keep Up With Blogs?
Nothing is more frustrating than checking your favourite blogs only to find that they haven't been updated since the last time you looked. And bookmark lists of blogs can look a lot like other bookmark lists. Surely there has to be a better way!
Well, there is and I'm going to tell you about one of my favourites: Google Reader
What is Google Reader?
Google Reader is a tool provided by our friends at Google that will keep track of your favourite blogs and let you know when one of them has changed.
Here is what my Google Reader page looks like:

From this, I know that 7 of the blogs that I've told Google Reader to keep an eye on have been updated since I last looked.
To have a look at the blogs that Google Reader is watching for me, I just double click on All Items (7) and then hit the space bar to move down the list a screen at a time. When All Items goes down to zero, I'm all caught up.
You can also see that I've organised the blogs I like into folders. If I don't have a lot of time to read blogs, I can pick which bunch I want to read first and save the rest for another time.
How do you get started using Google Reader?
If you are a total computer novice or would like to get an overview before you take the plunge, watch this tutorial. It lasts for about 10 minutes and covers lots of stuff that beginners would need to know and some that beginners won't need to know until later on. Worth a watch.
If you don't have a Google account, this tutorial will help walk you through this process. Remember that you don't have to use Gmail in order to have a Google account or to use Google Reader.
For more information about Google Reader, check out the FAQs (frequently asked questions, pronounced 'fax').
I hope you enjoy using Google Reader.
Sunday, April 19, 2009

Saturday, April 18, 2009

Friday, April 17, 2009

Thursday, April 16, 2009

Wednesday, April 15, 2009

Tuesday, April 14, 2009

Monday, April 13, 2009

Sunday, April 12, 2009
Siggies Are Finished!
Continuing on from yesterday's post, once the cream fabric was 'printed' with grapes, I cut the grapes and the feature fabric into 7" squares. I used the usual method for making half square triangles (HST) from squares but didn't cut them apart. I flipped up the feature fabric on each co-joined HST and stamped my details on each half.

 I ordered the stamp from Advance Printing (fast and reliable and not expensive) and picked the traditional, no-built-in-ink-pad option when it was time to pay. For the ink pad, I use the India Ink one from The Thread Studio because it has such high quality ink and produces sharp and washable images. In a pinch, I have used one from the scrapbook section of Lincraft that says on the label that it is waterproof and permanent when dry (which I always check, just to be sure).
When I stamped the fabric this time, I put a couple of layers of scrap fabric underneath to get a bit sharper image.
Now, it was time to heat set all the paint and ink. Being a lazy person, there was no way I was going to iron each one for 5 minutes. So I tossed the lot into the dryer set on the hottest setting (denim) and let the technology do the work for me. Remember that they were still in big squares; I hadn't cut them apart yet into individual squares.
When the dryer was done, I ironed them all and then cut them apart.
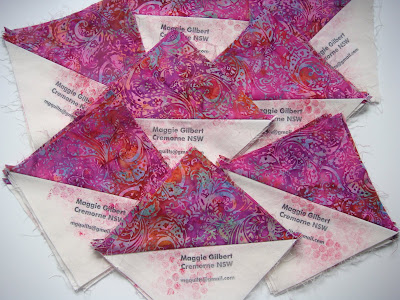 They were a bit 'hairy' from their time in the dryer.
 But that will be sorted out when I trim them to size (6 1/2" unfinished).
 Now, all I have to do is trim the other 70-odd siggies and I'm done!
Saturday, April 11, 2009
Houston, We Have Lift Off!
I'm off to Adelaide next week for the annual SCQuilters Retreat, so I guess it's time to start making the 70-odd signature squares that I'll be swapping. It seems that most of my fellow swappers are long finished, but where is the excitement in that? Nothing like a firm deadline and certain public humiliation to help focus the mind.
First step (after finding the fabric), is to stamp the signature part of each siggie. Tick.

 The theme of the Retreat is Wine and Roses. I've already finished my table topper, called 'Whining about Roses', which I'll post once the Retreat has started. But, for the siggie squares, I thought some bunches of wine grapes would be fun.
 And how did I make these grapes? Here are my tools:
 I stirred the paint with the chopstick and poured some paint out into the styrofoam plate. It helps to get the foam brushes wet at the sink first and squeeze them out really well. That way, the paint doesn't soak up into the sponge, never to come out; the water got there first.
For the paint, I used Setacolor Transparent - Fuchsia and Rose Bengale. I used two different shades of red/pink to liven things up but I'm not sure that it made that much difference. Not enough contrast perhaps.
I bunched up the bubble wrap, dabbed some paint on the foam brush, dabbed the foam brush on the bubble wrap and dabbed the bubble wrap on the fabric.
Since I don't know where the strips will be cut into blocks, I just made it up as I went. The directions on the paint containers say to heat set with an iron for 5 minutes ... yeah, right. I'll toss the siggies into the dryer to heat set them after they're finished.
And the green is in anticipation of some leaves to be added later on. Maybe. And I've got some ink pads and a stamp with my name, suburb and email address on it somewhere ...
I'll post some photos of the finished products once, well, there are some to show.
Friday, April 10, 2009

Thursday, April 09, 2009

Wednesday, April 08, 2009

Tuesday, April 07, 2009

Monday, April 06, 2009

Sunday, April 05, 2009

Saturday, April 04, 2009

Subscribe to:
Posts (Atom)


